Affiliate disclosure: This post may contain affiliate links. If you buy through a link on this page, MOTOZMO may earn a small commission at no extra cost to you. It helps keep our guides free. How we test and choose products.
Warm the engine fully, seat the mixture screw gently and back it out to your manual’s baseline, raise the idle a little, then turn the screw in eighth-turn steps until the RPM drops, back out until it drops on the rich side too, and set it at the peak between the two, about an eighth of a turn richer.
That skeleton works on every carbureted bike. What changes from bike to bike is which screw you have and which way richer actually is, and getting that backwards is the one mistake that makes a rough idle worse. I will walk through the diagnosis first, because half the bikes that get their mixture screw turned did not have a mixture problem.
If you want the circuit-by-circuit picture before touching anything, how a motorcycle carburetor works shows which parts own which slice of the throttle.
Is the Mixture Screw Even Your Problem?
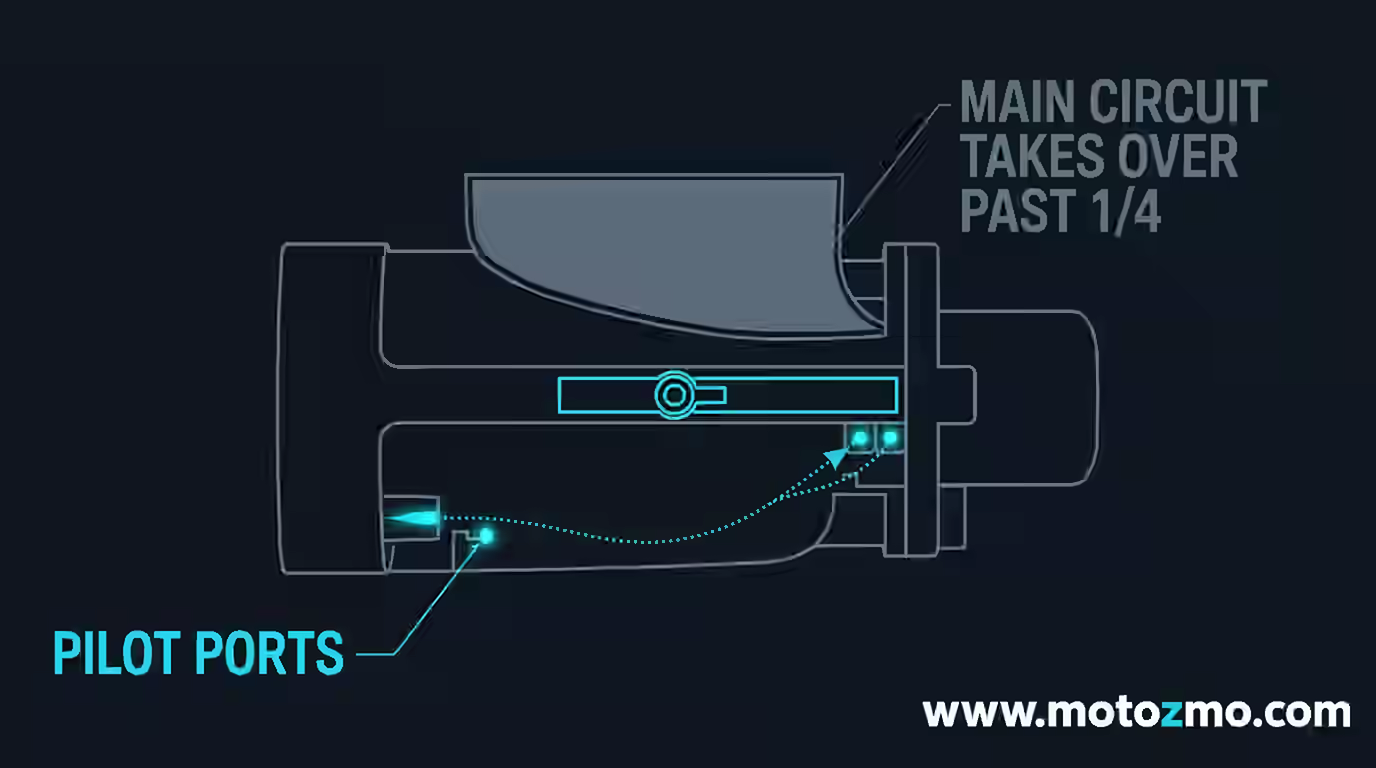
Start with what the bike is doing, not with the screwdriver. The mixture screw only governs idle and roughly the first quarter of throttle travel. Match your symptom to a likely state before you touch it:
| What the bike does | Probable state | First move |
|---|---|---|
| Idle hangs high after a blip, then settles slowly | Lean pilot circuit | Screw adjustment, richer direction |
| Idle drops below normal after a blip, then recovers | Rich pilot circuit | Screw adjustment, leaner direction |
| Popping through the exhaust on deceleration | Lean pilot circuit, or an exhaust leak | Screw adjustment first; leaks mimic this exactly |
| Black smoke, sooty plug, fuel smell at idle | Rich, possibly float level | Check float level before the screw |
| Rough idle only when cold, clears as it warms | Choke or enrichener fault | Clean the choke circuit, not the screw |
| Clean idle, stumbles past quarter throttle | Needle or main jet, not the screw | Stop; the screw cannot reach it |
Two reading skills do most of the work in that table. A lean idle hangs: blip the throttle and the revs stay up a moment before falling, because the thin mixture keeps burning after the throttle closes. A rich idle does the opposite, dipping under its set speed before climbing back. Learn to hear those two and you can diagnose this circuit from the saddle.
If the symptom lives past quarter throttle, put the screwdriver down. Mid-range hesitation is the needle circuit, and a bike that falls flat at wide-open throttle is talking about its main jet. Turning the idle screw to chase either one just breaks a setting that was fine.
What Has to Be True Before You Touch the Screw?
A mixture adjustment is a measurement, and measurements taken on a dirty or leaking carburetor are worthless. Work through this list first:
- The carburetor is clean inside. Varnish in the pilot jet changes the mixture on its own, and any setting you find will drift as the passages clear. If the bike sat over winter, clean the carburetor in place first; a carburetor cleaner chosen for the job makes that easier.
- No fuel is dripping. A carb that leaks is telling you the float needle is not sealing, and fuel level in the bowl changes every reading downstream. Fix the leak first using the carb leaking gas guide.
- No vacuum leak at the intake boots. Spray a little carb cleaner around the boots at idle; if the RPM changes, air is getting in past the carb and no screw setting will read true.
- The choke is off and the engine is fully warm. Not idled-for-two-minutes warm. Ride it ten minutes.
- You know your starting point. Before you turn anything, count the turns as you seat the screw gently, and write the number down. That count is your way back if the session goes sideways.
One more habit from the same list: change one thing at a time, ride, then decide. Two changes at once and you no longer know which one helped.
Do You Have a Fuel Screw or an Air Screw?
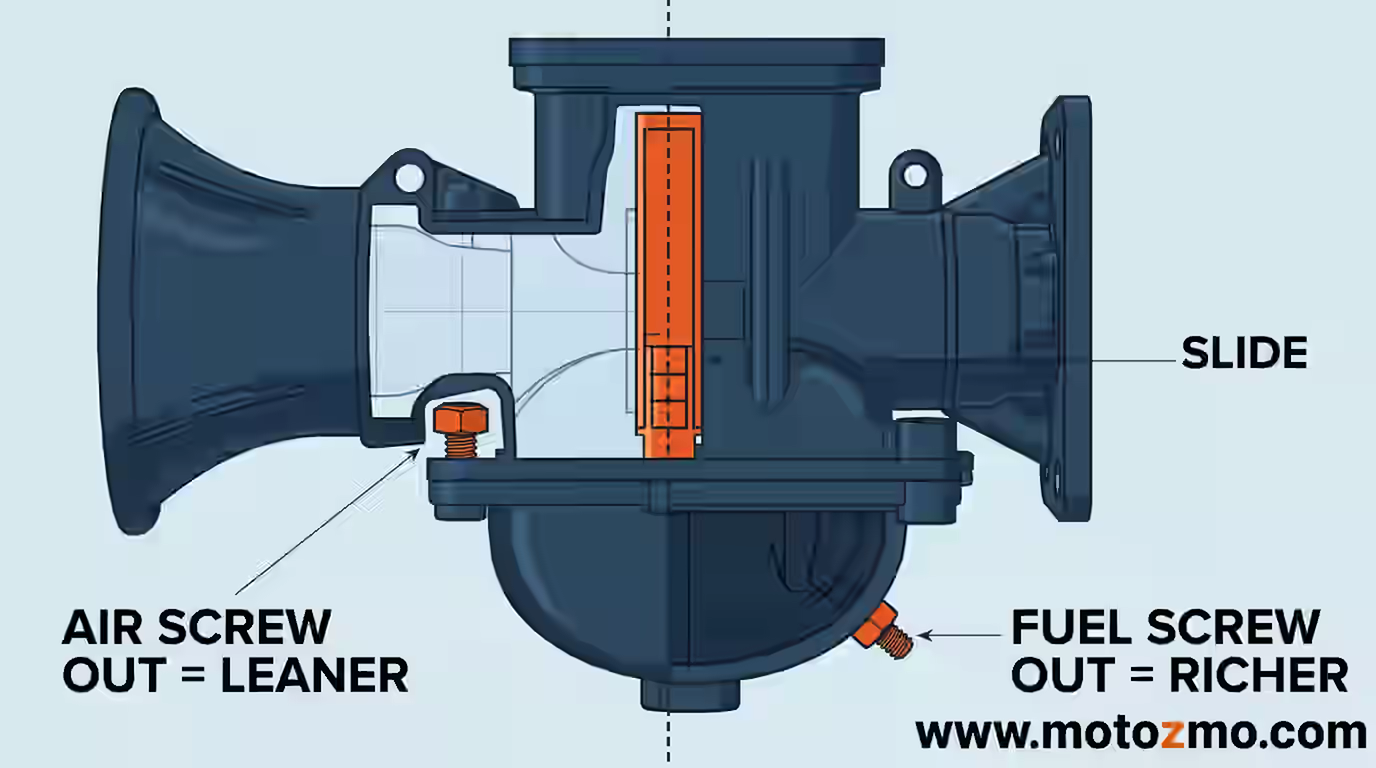
This is the question the whole job turns on, and it is answered by location, not by the screw’s name in a forum post. Follow the airflow from the filter to the engine and find the slide or throttle plate. The screw’s position relative to it decides what the screw meters:
| Screw | Location | What it meters | Turn out (counterclockwise) | Turn in (clockwise) |
|---|---|---|---|---|
| Fuel screw | Engine side of the slide, often under the bowl | Fuel | Richer | Leaner |
| Air screw | Air-filter side of the slide | Air | Leaner | Richer |
Mikuni’s own HS40 manual describes its pilot screw as controlling “how much fuel is allowed to enter the carburetor venturi,” and gives the directions plainly: turn the screw out to richen the idle mixture, in to lean it.
Mikuni’s VM carbs use the other design: in the VM Super Tuning Manual, fuel metered by the pilot jet is “mixed with air adjusted in a proper amount by the air screw,” so opening that screw admits more air and leans the idle.
Same job, opposite directions. Most four-stroke carbs put a fuel screw under the float bowl, and most two-stroke and older designs use an air screw on the side, but the location test beats the rule of thumb every time.
The same Mikuni manual gives you the most useful diagnostic in this whole article. A healthy pilot circuit finds its best idle with the screw somewhere in its working range, which Mikuni puts at 1/4 to 3-1/2 turns out from gently bottomed.
If your best idle needs more than about three turns out, Mikuni’s verdict is that the pilot jet is likely too small. If it needs less than a quarter turn, the jet is likely too big.
A screw setting jammed against either end of its range is not a setting. It is the carburetor asking for a different pilot jet, and no amount of careful turning fixes that.
Some road bikes hide the screw under a plug or cap, because idle mixture is an emissions-related adjustment and the Clean Air Act prohibits tampering with emission control devices in ways that increase pollution.
In practice the rule targets defeat devices and gutted converters, not a rider returning a screw to its documented setting, and manufacturers print the adjustment in their own service manuals. Stay inside the documented range and you are doing maintenance, not tampering.
What Is the Baseline Setting, and Why Is It Only a Start?
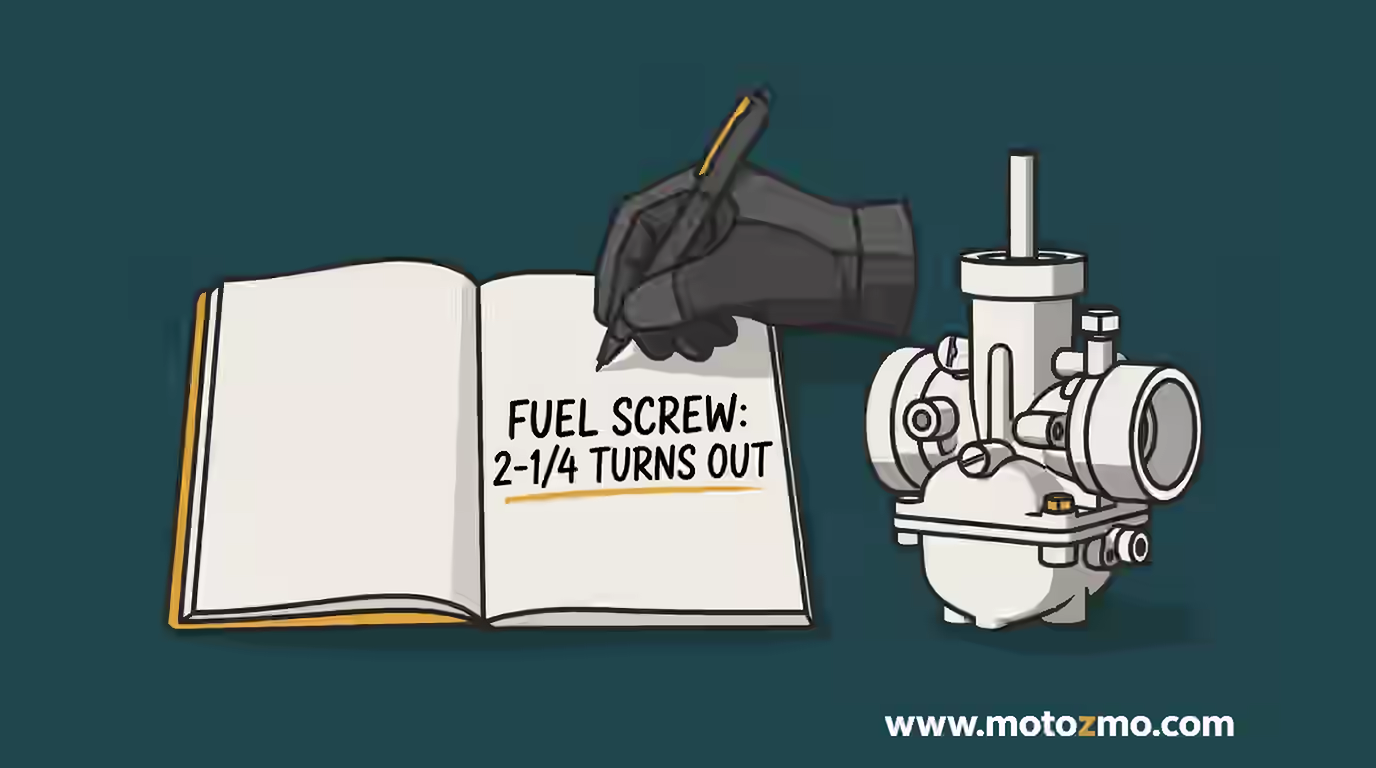
Your service manual’s turns-out figure, counted from lightly seated, is the baseline. Published baselines for common Keihin and Mikuni carbs usually land between 1.5 and 2.5 turns out, but the spread is real: a setting that is right for one carb can be a full turn off for another, which is why the manual’s number governs and the range is only a get-it-running fallback when no spec exists.
Two cautions belong with every baseline. Seat the screw gently. The tapered tip and its seat are soft brass, and a screw cranked down hard scores both; a damaged seat is a carburetor problem, not a five-dollar part.
And treat the baseline as the floor of the job, not the result. It puts the bike at a known, rideable setting so the real tuning, the hunt for the peak, starts from solid ground.
Reaching the screw is its own problem on many four-strokes, where the fuel screw points up under the bowl with the engine in the way. An angled pilot-screw tool reaches most of them.
The permanent fix is an extended or remote fuel screw, a longer replacement screw you can turn by hand; they are made per carb family, so match one to your carb before ordering. It is the one purchase this job genuinely justifies if you tune with the seasons, because a screw you can reach is a screw you will set correctly.
How Do You Set the Mixture, Step by Step?
Step 1: Warm the Engine Fully
Ride the bike ten minutes. A cold engine runs enriched through its choke circuit, and a mixture set cold is a mixture that is wrong at operating temperature. This is the most common reason a careful adjustment feels wrong the next morning.
Step 2: Raise the Idle Speed a Little
Use the idle speed screw, the one that bears on the throttle linkage, to lift the idle to a fast idle. Motocross Action’s tech column uses about 1,800 rpm as a rule of thumb for fuel-screw bikes, because a faster idle makes the RPM changes from the mixture screw easier to hear.
If your bike has no tachometer, a quarter turn on the speed screw past normal is close enough; you are listening for change, not chasing a number.
Step 3: Find the Lean Limit
Turn the mixture screw in, an eighth of a turn at a time, and wait five to ten seconds after each move for the idle to settle. On a fuel screw, in means leaner. Keep going until the RPM starts to drop and the idle roughens. That is the lean limit. Note where it sits.
Step 4: Count Back Out Through the Peak
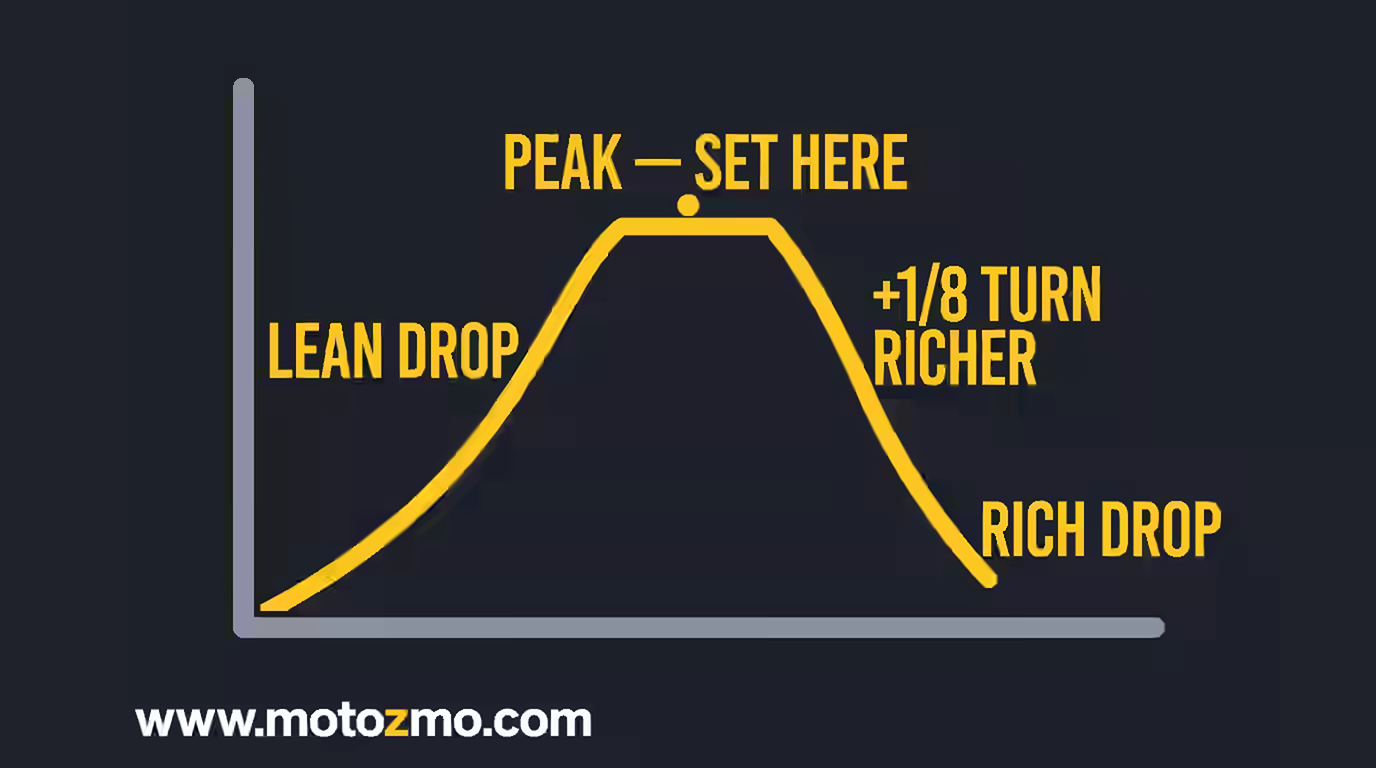
Now turn the other way, slowly, counting turns as you go. The RPM climbs, and the exhaust note sharpens. Keep turning and the note dulls, the idle gets lumpy, and the RPM falls again: the rich limit. The highest, steadiest idle lives between the two limits you just found.
Step 5: Set the Peak, Then Add a Small Rich Margin
Set the screw where the idle peaked. Then turn about an eighth of a turn richer: out on a fuel screw, in on an air screw. Peak RPM is a hair lean of the setting that rides best, and the small margin covers hot weather and a hard pull away from a stop, where a lean pilot circuit stumbles first.
Step 6: Reset the Idle Speed and Re-Trim
Bring the idle speed back to your manual’s figure with the speed screw. The two screws interact, so run the mixture hunt once more, quickly. It should now peak close to where you left it. If it moved a lot, something else is going on; go back to the preconditions list.
Step 7: Work Through Multi-Carb Bikes One Carb at a Time
On a twin or four with a screw per carb, run the same hunt on each carburetor, then synchronize the set so they open together. Sync is a job of its own, covered in the carburetor maintenance guide, and an unsynced bank will idle rough no matter how well each screw is set.
Mistakes that undo this procedure: tuning on a half-warm engine, making quarter-turn or bigger moves, not waiting for the idle to settle between moves, and seating the screw hard while counting. Every one of them produces a setting that feels right in the driveway and wrong on the road.
How Do You Verify the Setting on a Ride?
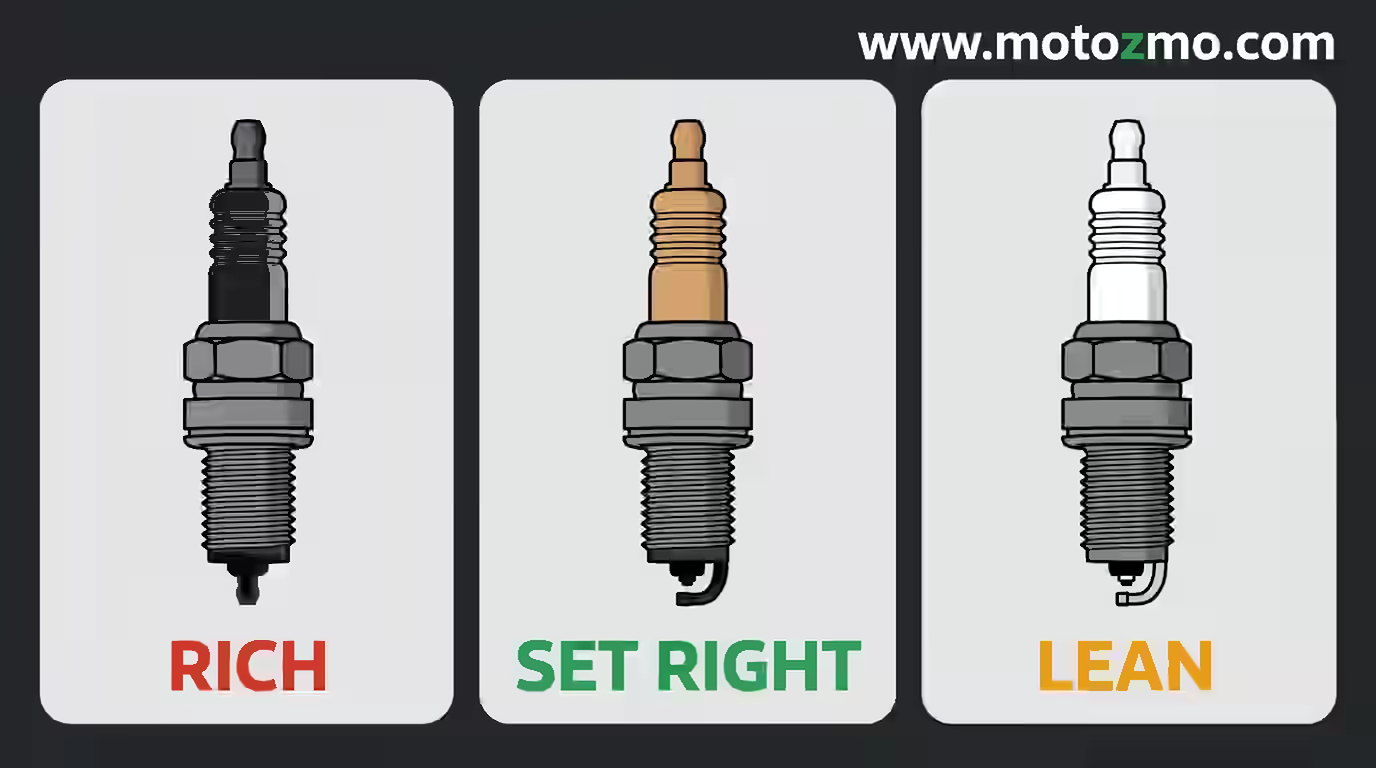
Ride ten to fifteen minutes with stops, steady cruising, and a few pulls away from lights. Three checks tell you where you landed:
- At stops: the idle should return to its set speed and stay there. Revs that hang high before settling say the pilot circuit is still lean; an idle that dips and recovers says rich. Go back a step and move the screw an eighth of a turn in the direction the symptom names.
- On deceleration: light popping points lean. The backfiring guide separates mixture popping from exhaust leaks, which sound alike and are fixed differently.
- Off the line: a clean pick-up from closed throttle with no bog and no stumble is the pass mark for the whole job.
Then read the plug. Shut the engine off at the end of a steady low-speed stretch, pull a plug, and look at the insulator: light tan or gray is right, white and dry is lean, black and sooty is rich.
Read it with one caveat: modern unleaded fuel and ethanol blends color plugs less strongly than the leaded fuel the old charts were drawn for, so treat the plug as confirmation of what the ride already told you, not as the only witness.
Finish by writing down your final turns-out count. The next time the bike needs this, after a cleaning or a season change, that number is your personal baseline, and it is worth more than any figure in a forum thread, including the ones in this article’s research.
What Changes at Altitude or in a New Season?
Air thins as you climb, and a carburetor cannot sense it. The same fuel meets less air, so the mixture drifts rich on its own. Standard atmosphere figures put air density at roughly 91% of sea level at 3,000 feet, 86% at 5,000 feet, and 79% at 8,000 feet.
The screw can absorb the first part of that change, in the leaner direction, and for a trip over one pass that is usually all you need. Sustained riding much past 4,000 to 5,000 feet is a different job: the mid-range and top end go rich as well, and those belong to the needle and main jet, set from your manual’s altitude chart if it prints one.
Temperature works the same way at smaller scale. Cold, dense air leans the mixture slightly, hot air richens it, which is why a bike set in July can want an eighth of a turn in January. Seasonal re-trimming is normal maintenance on a carbureted bike, not a sign something broke.
When the Screw Will Not Fix It
Some faults wear a mixture problem’s clothes. Work this list before you blame the screw:
- The best idle sits at the edge of the screw’s range. Under a quarter turn or past three turns out, the pilot jet is the wrong size (Mikuni’s rule, above). Change the jet, then tune.
- The idle will not settle at any setting. Suspect a vacuum leak, a clogged pilot jet, or a float level that is off. The maintenance guide linked in Step 7 covers the cleaning and checks in order.
- The engine dies the moment you open the throttle. That symptom has its own diagnostic path in engine dies when throttle applied, and most of its causes are not the idle screw.
- The engine cuts out at speed or at random. Stop chasing mixture. An engine that keeps cutting out is usually a fuel delivery or electrical fault, and it is a safety problem before it is a tuning problem.
- Two or more carbs that will not sync, a worn throttle shaft, or low compression. These are mechanical. A screwdriver cannot fix them, and the honest next step is a compression test and a mechanic’s ear.
Where Does the Rest of the Carb and Engine Cluster Live?
This page is the hub for carburetor diagnosis on the site. When the problem is not the mixture screw, one of these is the guide you want:
| Your problem | Go to | What it covers |
|---|---|---|
| You want the theory first | How a motorcycle carburetor works (linked in the intro) | The three circuits and which throttle range each one owns |
| The carb is dirty or the bike sat all winter | Cleaning a carburetor without removing it (linked in the preconditions) | In-place cleaning before any tuning |
| Cold starts are the problem | Choke cleaning | True choke vs enrichener, stuck choke fixes |
| Fuel is dripping from the carb | Carb leaking gas (linked in the preconditions) | Float, needle, float height, and petcock causes |
| Routine upkeep, cleaning, sync | Carburetor maintenance (linked in Step 7) | Schedules, jet cleaning, synchronization |
| The engine dies under throttle | Engine dies when throttle applied (linked in the section above) | Accelerator pump, vacuum leaks, jet blockage |
| The engine cuts out while riding | Engine keeps cutting out (linked in the section above) | Fuel, spark, air, and electrical diagnosis |
| Carb or injection, which is it | Carburetor vs fuel injection | How the two systems differ and what it means for faults |
| It clicks but will not start | Won’t start but clicking | Battery, connections, and relay, in that order |
| The battery keeps dying | Motorcycle battery keeps dying | Charging and parasitic drain diagnosis |
| It will not start when hot | Won’t start when the engine is hot | Heat-related starting faults |
| How hot is too hot | How hot does a motorcycle engine get | Normal temperature ranges by engine type |
| A new noise under acceleration | Engine noise when accelerating | Reading engine noises before they get expensive |
| The problem is somewhere else entirely | Motorcycle problems and fixes | The whole-bike diagnostic map |
The Bottom Line
Count your starting turns, work on a warm and clean engine, change one thing at a time, and let the ride grade the result. If the idle hangs, you are lean; if it dips, you are rich; if the best setting sits at the end of the screw’s travel, the pilot jet is wrong and the screw was never the villain. Everything else in the carburetor cluster hangs off that one page of method, and the map above is the way back when the fault turns out to live somewhere else.